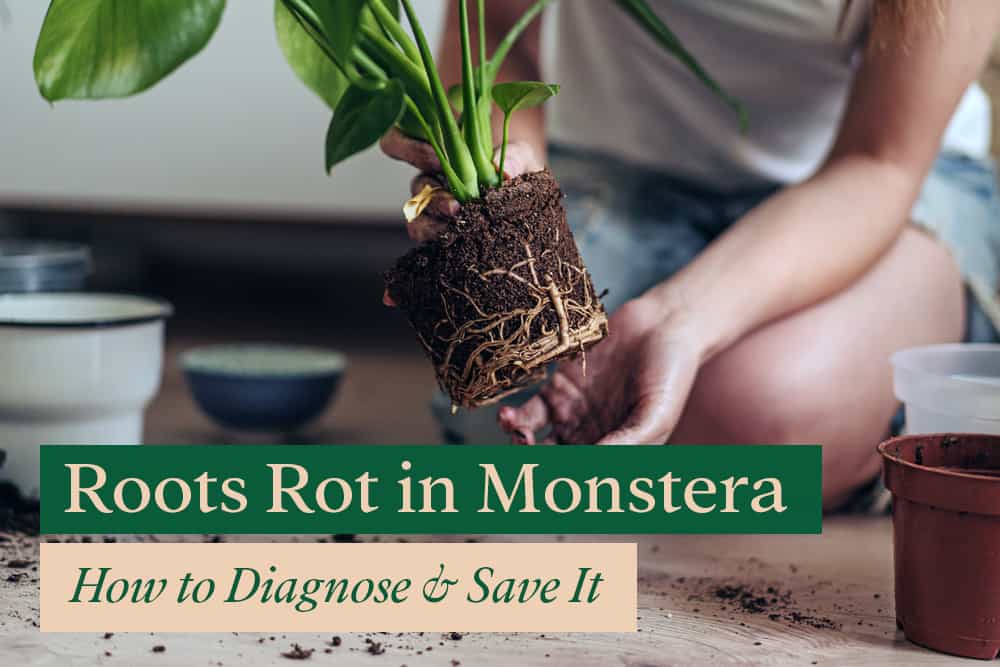
Monstera is a beautiful plant to keep in your home. Unfortunately, like many plants, it is susceptible to root rot if it is not being given ideal conditions. Unless it is caught, root rot will end up killing your beloved Monstera.
Fortunately, this comprehensive guide to root rot in Monsteras will help you keep your plant healthy. In this article, we have everything you could possibly want to know about root rot in Monsteras:
- What is root rot?
- What causes root rot in Monsteras?
- Signs that your Monstera has root rot
- How to inspect your Monstera for root rot
- How to prevent root rot in your Monstera
- How to treat your Monstera for root rot
- Natural fungicides for Black Root Rot
Ready to learn how to keep your Monstera safe and happy? Let’s get started!
Disclaimer: As an Amazon Associate I earn from qualifying purchases.
What is Root Rot?
Root rot is a fungal infection in the soil caused by overwatering. Too much moisture in the soil for too long creates an anaerobic environment, which will then cause your Monstera’s roots to begin to decay and rot.
Once root rot takes hold, it starts by destroying the plant’s roots and works its way up to the main stem.
The roots turn from white to black and slimy, and eventually die. If not taken care of, root rot will kill a Monstera quickly.
As the roots are under the soil, it is hard to notice root rot unless you pay attention to other signs your Monstera gives you that it is not healthy.
Root rot can be caused by various factors, all of which have to do with there being too much water in the soil for too long. Plants need air just like we do! Root rot can be caused by chronic overwatering or if the soil has already been contaminated by fungal root rot, a single occasion of overwatering.
What Causes Root Rot in Monstera?
So now we know what root rot is, let’s explore what causes it.
We know that root rot loves anaerobic soil caused by excess moisture. Unfortunately, there are lots of ways for this to happen and for infection to take hold.
Overwatering
Overwatering is the main culprit and the most common way for a Monstera to fall victim to root rot.
Overwatering can be caused by a few different things, all of which cause more water to accumulate in the soil than your Monstera can drink.
Your Monstera’s soil should be moist like a wrung-out sponge, not soggy or wet to the touch.
Some causes of overwatering:
- Watering too frequently
- Not enough drainage in the pot
- Too much clay or organic matter in the soil
- Pot is too big
Watering your Monstera too frequently can cause it to become overwatered and develop root rot.
To prevent yourself from watering your Monstera too often, you need to check its soil moisture and only water it once the top two inches of soil are dry.
When you water your Monstera, give it lots of water until it starts running out the drainage hole in the bottom.
The amount of water you give your Monstera in one sitting will not affect its likelihood of developing root rot, as long as the soil has dried out enough. Overwatering only occurs when you watered your Monstera when the soil was already wet.
Also read: Complete Guide to Watering a Monstera – How Often Should You Water?
Not enough drainage in your Monstera’s pot can also contribute to overwatering.
A pot without proper drainage in the bottom will cause water to collect in the bottom of the pot.
If this water sits too long without being absorbed by your Monstera, the soil and roots will start to rot in the anaerobic environment.
Too much clay or organic matter in the soil will prevent water from draining as well. Too much water sticking around for too long can cause root rot. You want your Monstera’s soil to drain freely.
Garden soil is not suitable for potted plants like Monsteras because it retains too much moisture and can contain pathogens that cause root rot and other diseases or pests.
A pot that is too big can also be a cause of root rot. When your Monstera’s pot is too big, there are soil sections that contain no roots to take up water.
Those root-less sections of soil will stay wet for a very long time until the water naturally evaporates. If it takes too long to evaporate, the soil may begin to decompose and cause the roots to start rotting as well.
When repotting your Monstera, the new pot should never be more than 2” (or 5cm) larger than the old pot in diameter.
Underwatering
Underwatering may not directly cause root rot. However, when you forgot to water your Monstera for an extended period of time, the root system will adapt to the dry situation. The roots start to shrink and compact in size.
This reaction causes the pot to have rootless soil sections (similar to placing the Monstera on a large pot).
When you finally water the pot, and the soil takes too long to dry, the root may develop root rot.
Fungal Infection
Root rot is a fungal infection in the soil. There are a few types of fungi that cause root rot, including but not limited to Pythium, Rhizoctonia, and Fusarium.
If these fungi already live in your Monstera’s soil, it is more likely that overwatering will quickly lead to root rot.
Spores from these fungi travel through the air and are carried by insects. If one of your houseplants has fungal root rot, the fungus has likely travelled to other pots of soil in your home. It will not grow or cause damage unless the soil becomes waterlogged.
Cold Climate
If you live in a cold climate, your Monstera will slow down its growth in the winter. During this slow growth period, your Monstera will need less water; thus, you don’t need to water it frequently.
Check the soil before you water to ensure that the top two inches (5 cm) are dry to prevent root rot.
Rocks at the bottom of the pot
Contrary to popular belief, rocks at the bottom of a plant pot do absolutely nothing to drainage. The only thing they do is keep soil from falling out the drainage hole, which doesn’t usually end up being an issue anyway.
Soil acts like a sponge, soaking up water until it is fully saturated. Only when the lowest soil points are fully saturated does the water start to leak out the bottom. Putting rocks or gravel at the bottom of the pot raises the lowest level of soil, raising the height of that soggy soil.
With rocks at the bottom of the pot, your Monstera is basically in a shallower pot with soil that doesn’t drain any better.
Signs of Root Rot in Monstera
| Stages of Root Rot | Signs to observe on your Monstera |
|---|---|
| Early detection | • Stagnant growth •Wilted leaves • Yellow leaves |
| Advanced root rot | • Root discoloration • Foul odor roots • Black spots on leaves |
| Beyond saving | • Roots are all dead • Dark and mushy stems |
It is crucial to know the signs of root rot in Monstera so that you can prevent an infection from spreading and killing your beautiful swiss cheese plant.
Here are some signs that your Monstera is suffering from root rot, organized by severity. The earlier you notice root rot in your Monstera, the more likely it is to survive!
Early Detection
Early signs of root rot in Monstera are stagnant growth, wilted leaves, and yellow leaves. These are all signs that you should check your Monstera’s soil to make sure it is not too wet for too long. With proper care and early detection, your Monstera can easily survive a bout of root rot.
Stagnant growth
Stagnant growth just means that your Monstera isn’t growing as fast as it usually does. This is a normal thing that happens in the winter when the temperature drops and the days get shorter. Monsteras also slow their growth when they don’t get enough light, fertilizer, or water.
Just because your Monstera is slowing down its growth doesn’t mean its roots are rotting, but it does mean that it could happen if you don’t also slow down its watering schedule.
A plant like Monstera growing slowly will not need as much water, and too much water during stagnant growth can cause root rot.
Wilted leaves
Wilted leaves indicate that your Monstera isn’t getting enough water from the soil. If your Monstera is wilting, check its soil to see if it is wet or dry.
If the soil is dry, your Monstera is simply thirsty. It would be best if you gave it a good, long drink of water as usual.
If the soil is already wet and your Monstera is droopy, that means its roots are probably damaged from rot and unable to take up the water that is already there. At this point, you should inspect your Monstera’s roots and look for rot.
Yellow Leaves
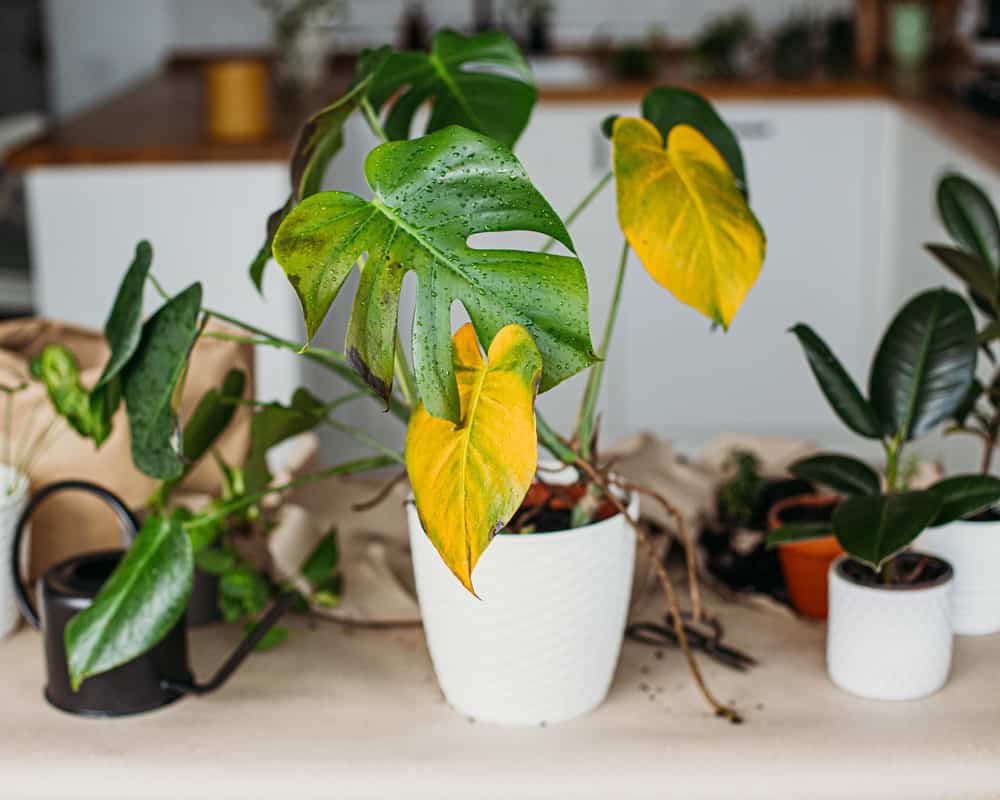
Yellow Monstera leaves can mean a lot of things, including overwatering and root rot. Yellowing leaves is the next step after drooping leaves if your Monstera continues to sit in soggy soil.
If your Monstera has yellow leaves, you should definitely check its soil and roots for excess moisture and rot.
Advanced Root Rot
If the early warning signs are ignored or go unnoticed, your Monstera’s health will continue to decline.
The signs of advanced root rot are black leaf spots, foul-smelling roots, and root discoloration. These signs mean your Monstera needs immediate and drastic care.
It will need a full inspection, and you will have to cut off the dead or dying parts to keep the plant alive.
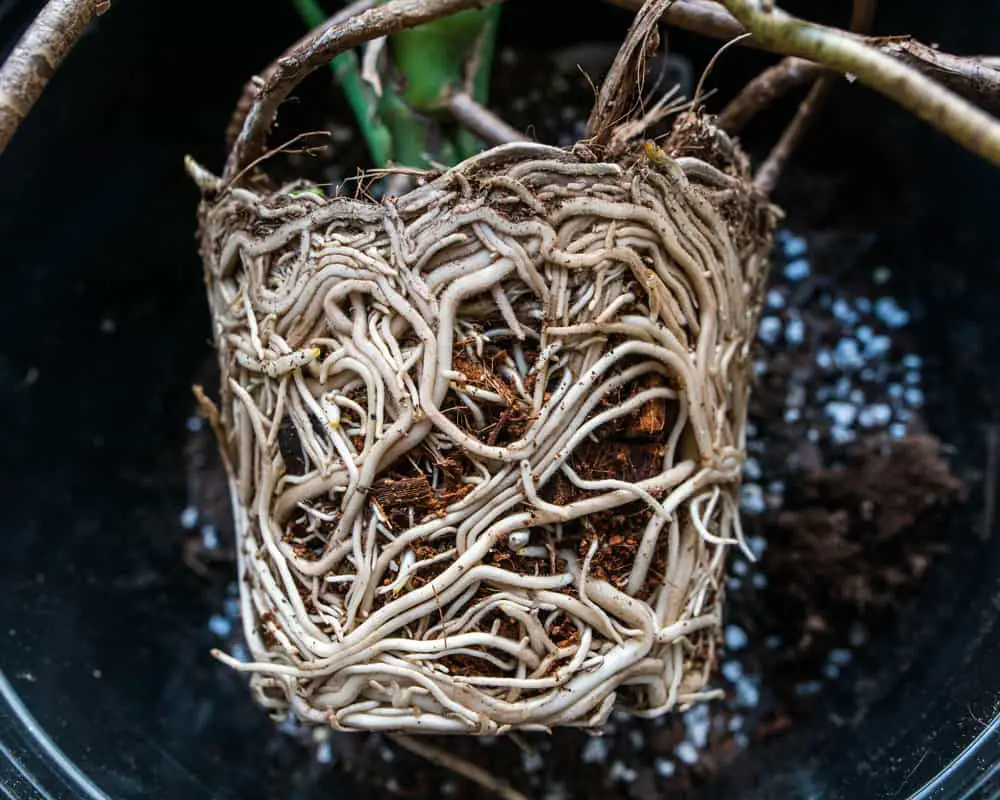
Root discoloration
Your Monstera’s roots are supposed to be whitish, like most plants. When root rot sets in, the rotting roots turn brown or black, and they get mushy and slimy. You can’t see this unless you dig into the soil or take your Monstera out of its pot to inspect the roots.
When treating your Monstera’s root rot, all dark and discolored roots will need to be cut off; otherwise, the infection will continue to spread.
Foul odor roots
Rotting roots stink!
If you put your face up close to your Monstera’s soil, and it smells like something is rotting, something is definitely rotting, and it’s probably your Monstera’s roots.
The stronger the smell, the larger the infection and the harder it will be to keep your Monstera alive at this point.
Black spots on leaves
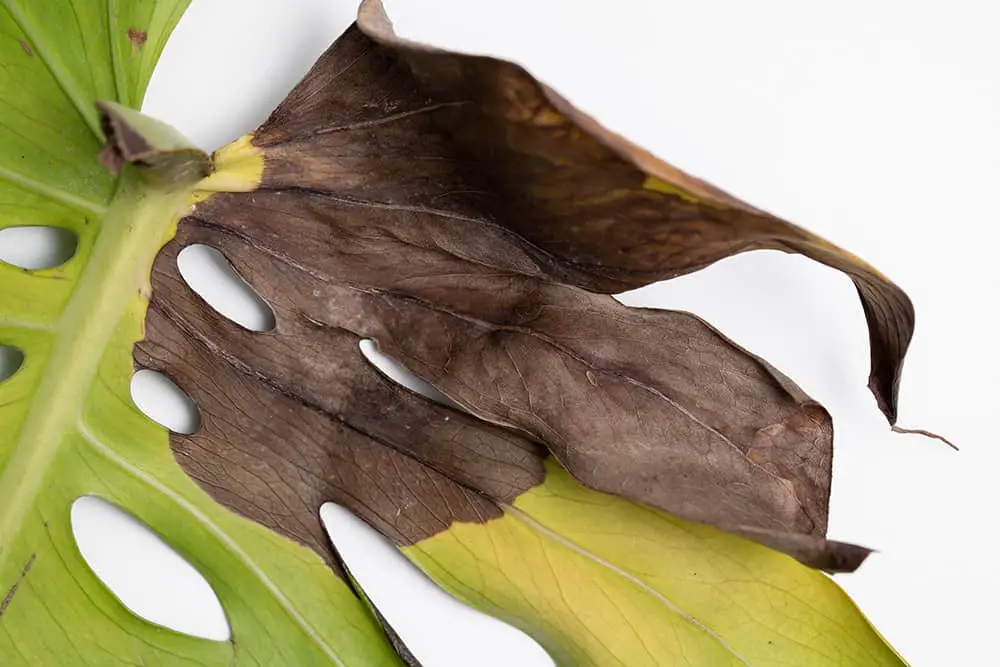
Black spots will start to show up on your Monstera’s leaves, sometimes accompanied by yellowing around the spot. This is an indication that the infection has started to spread throughout the plant.
Root rot will eventually spread through the entire plant, up the roots to the stem to the leaves. Black or brown spots on the leaves are how you know that process is occurring.
Beyond Saving
Unfortunately, sometimes we miss the signs of root rot until it is too late. Once the rot kills all the roots and moves up into the stem, your Monstera is on its way out.
At this point, the only way to salvage your Monstera would be to try to propagate uninfected sections of the stem, if there are any left.
Roots all dead
Your Monstera is unlikely to survive once all its roots are dead. Even though we don’t see them, roots play a vital part in the life of every plant. No roots mean your Monstera can’t take in any water or nutrients, and it will likely die of dehydration.
Dark and Mushy stem
Once the rot travels into your Monstera’s main stem, that stem will become dark and mushy like the roots. The rotten stem is unable to transport water and nutrients to the leaves, and the Monstera will soon die.
Inspecting for Root Rot
If you notice any of the above signs in your Monstera, you should inspect its soil and roots for rot. If the signs are mild, you can get away with digging away a portion of the soil to look at the roots.
If your Monstera displays signs of more advanced root rot, such as black, slimy roots or black spots on the leaves, you should take it out of its pot for a more detailed inspection.
Taking your Monstera out of its pot for a root inspection is the best way to detect root rot. Unfortunately, it tends to stress your Monstera out, causing it to droop its leaves for a little while. It is worth it to inspect because a little bit of stress on your plant is not as bad as letting its roots rot.
When you inspect your Monsteras roots for rot, look out for the following:
- Brown or black slimy roots that break easily
- Waterlogged soil
- Foul-smelling roots and soil
- Mushy roots and stem
If you see these signs of root rot in your Monstera, proceed to the next section to learn how to treat it!
Treating Root Rot in Monstera
Now you know if your Monstera has root rot, it is time to learn how to treat it so your Monstera can keep living a healthy life.
Step 1: Rinse the roots.
Since root rot is a disease that lives in the roots and soil, we need to get rid of all the infected soil. Take your Monstera out of its pot and brush away as much soil as you can with your hands. If the rot is nasty, some roots will come off easily with the soil.
Once you get rid of the soil, you will get a better idea of how far the rot has eaten into your Monstera.
You need to get rid of all the infected soil. Once you are done brushing it away manually, rinse off the rest with water. A small Monstera can probably fit in the kitchen sink, but a large specimen will need to be sprayed down with a hose outside.
Step 2: Cut the damaged roots
Once all the soil is gone, you need to cut off all the dead and rotting roots.
You do not want to spread the fungal infection to healthy roots! Use rubbing alcohol or diluted bleach to disinfect your pruners in between every single cut.
Cutaway as much infected material as you can from your Monstera. You don’t want to leave any behind that can grow into another significant infection.
If, by the time you’re done cutting away the dead parts, there are no more roots or the rot extended into the stem, skip to Step 7.
Step 3: Let the roots air-dry, disinfect roots and pot.
Just in case there is still rot lingering on the roots, you need to let them dry out before repotting. For extra disinfection, you can also dip the remaining roots into diluted hydrogen peroxide (1 tablespoon peroxide for each cup of water) before setting them out to dry.
While the roots sit out to dry, prepare its pot and new soil. Clean the pot, and any supports completely and disinfect with diluted bleach or peroxide. Dispose of the old, contaminated soil.
Step 4: Repot in fresh soil.
Once your Monstera’s healthy roots have dried out enough, it is time to repot! You must use fresh, new soil for your Monstera. Old, infected soil will just cause your plant to develop root rot again.
Now is the time to adjust your potting soil to have better drainage by adding more perlite or sand to the mix. Better draining soil will help prevent your Monstera from developing root rot in the future.
Step 5: Prune affected leaves
It is a good practice to cut back a third to a half of your Monstera’s leaves when you cut back its roots. With fewer roots, it won’t be able to support as many leaves, and they will droop. Cutting back leaves affected by root rot will allow your Monstera to bounce back faster.
Step 6: Place in bright sunlight
Monsteras are happiest in bright, indirect light. When they don’t get enough light, they don’t take up as much water and are susceptible to developing root rot.
Not only will bright light keep your Monstera from developing rot, but it will also help it grow bigger and taller.
Also read: How Much Light Does a Monstera Need?
Step 7: (In severe cases) Propagate from healthy cutting.
If, when cutting back the roots, you find that your Monstera has no healthy roots left, you won’t be able to repot it as normal. At this point, you will have to help it grow new roots by propagating stem pieces.
First, cut off all rotten parts of your Monstera—roots, stems, leaves, anything that has been affected by root rot.
Do you have any pieces of stem left with leaf nodes? If so, great! Your Monstera is not dead yet!
There are two main ways to propagate Monstera stem cuttings: you can plant them as if you were repotting them, or you can propagate them in water.
To propagate them in soil, just follow steps 4 and 5 above. Avoid placing the baby Monstera in bright light until it has started to develop roots. You can check to see if it has roots yet by giving it a light tug.
For water propagation, place the Monstera stem in a glass or vase of clean water. Change the water every few days to keep it clean. Once it starts growing roots, you can repot it as in Step 4.
How to Prevent Rot Root
Ultimately, the best way to keep your Monstera from dying from root rot is to prevent it from happening in the first place. Thankfully this is easy to do with a little bit of extra attention to your amazing plant!
Proper Drainage
Your Monstera’s pot absolutely must have drainage holes. There is no way to get around this.
Unfortunately, Most of the prettiest pots do not have drainage holes. You can remedy this in one of two ways: drill a drainage hole in the pretty pot or use a simple plastic pot with drainage inside the pretty one.
Also Read: How to Choose the Perfect Pot for your Monstera
Aerate the soil
In addition to proper drainage, your Monstera’s soil needs aeration.
Adding perlite or sand to your potting mix during repotting will allow the water to flow more freely through the soil and allow more oxygen to reach your Monstera’s roots
Also read: Choosing the Best Soil Mix for Monstera to Thrive.
Water Schedule
Even if your Monstera has adequate drainage and soil, it may still be waterlogged if you are watering it too frequently.
Your Monstera’s watering schedule may need to be longer if it does not get as much sunlight or if its growth slows down like during the winter.
This leads to my next point…
Check Soil before Watering
The only way to know for sure if your Monstera is ready to be watered or not is to check the soil before watering. Your watering schedule should only be a guideline, and you should always adjust it based on your Monstera’s actual needs.
To check the soil, stick your finger straight down into the top layer. If the soil is still damp, you don’t need to water yet. Your Monstera is ready for water once the top 2-3 inches (5-6 cm) are dry.
Inspect for Pest & Fungal Infection
Regular inspections of your Monstera will help you catch infections before they become deadly. Especially during the winter, you should make a point of regularly inspecting your Monstera’s leaves, stems, and soil for signs of pest and fungal infections.
Signs of infections include drooping leaves, yellow leaves, and soil discoloration (in the case of a fungus).
Natural Fungicide for fungal Black Root Rot
In the case of fungal root rot, there are natural fungicides you can use to help treat your Monstera.
These include
- Hydrogen peroxide
- Cinnamon
- Baking soda
- Apple cider vinegar
- Neem oil
Hydrogen Peroxide
Hydrogen peroxide is a bleach and disinfectant which, when diluted, can be used to treat root rot.
To use hydrogen peroxide to treat root rot in Monstera, mix one tablespoon of 3% strength peroxide and one cup of water. This can be used directly on the roots after pruning or as a supplemental oxidization treatment during watering.
The extra oxygen molecule in hydrogen peroxide fights directly against the anaerobic environment in which root rot thrives!
Cinnamon
Cinnamon is a natural fungicide and rooting agent.
Use cinnamon when treating your Monstera for root rot by dusting it on its freshly-cut roots (or stem). The cinnamon will help prevent rot from affecting the healthy tissue, and it will stimulate new root growth.
Baking Soda
Baking soda, or sodium bicarbonate, is another natural and organic fungicide used to treat root rot.
Be careful not to use too much too often, as baking soda is a salt, and too much salt of any kind is not good for your Monstera.
To use baking soda as a fungicide, mix three tablespoons into a gallon of warm water. Spray it into your Monstera’s soil and stems in the evening to help prevent a fungal root rot infection.
Apple Cider Vinegar
You can also use apple cider vinegar to combat fungal black root rot in your Monstera. Like the baking soda, mix ACV with a gallon of water and spray onto your Monstera’s leaves, stem, and soil.
Neem Oil
Neem oil is excellent for getting rid of insect and fungal infections in your Monstera. Neem oil can be used to combat fungal root rot when used as a soil drench.
Mix a teaspoon of neem oil with a quart (1 liter) of water. Add a couple of drops of dish soap to emulsify the mixture, and mix well. Apply this drench to your Monstera’s soil after watering.
Related Questions:
Can you reuse soil that has root rot?
Absolutely not!
Root rot causing fungi can live in the soil for years, and all it takes is a few days of too much water for them to start attacking your Monstera’s roots again. Infected soil should be disposed of.
Do not compost diseased plants or soil, as this will only lead to the infection possibly spreading.

