Does your precious peace lily outgrow its pot? Are the leaves getting too big and starting to crowd each other? Do you want your plant to have more flowers? It sounds like it’s time to divide your peace lily!
Generally, peace lily plants can be propagated by division as long as the plant has multiple crowns (the connective tissue which joins the roots and stalks). This means that you can take one plant and divide it into multiple plants.
Not only will this give you more peace lilies, but it will also help keep your plants healthy by giving them more room to grow.
This process may seem daunting, but I promise it’s not as complicated as it sounds. You will learn how to divide peace lily plants step-by-step in this article.
Let’s get started!
Things to Know Before Dividing Peace Lilies
Before we dive deep into the process of division, there are a couple of things you should know:
Peace Lilies Won’t Grow From Cuttings
When I first started propagating plants, I thought that you could propagate any plant from cuttings. Unfortunately, this is not the case.
Growing peace lilies from cuttings are impossible since the nodes responsible for producing new roots and stalks are located in the rhizome, which is located just below the soil surface instead of the stem.
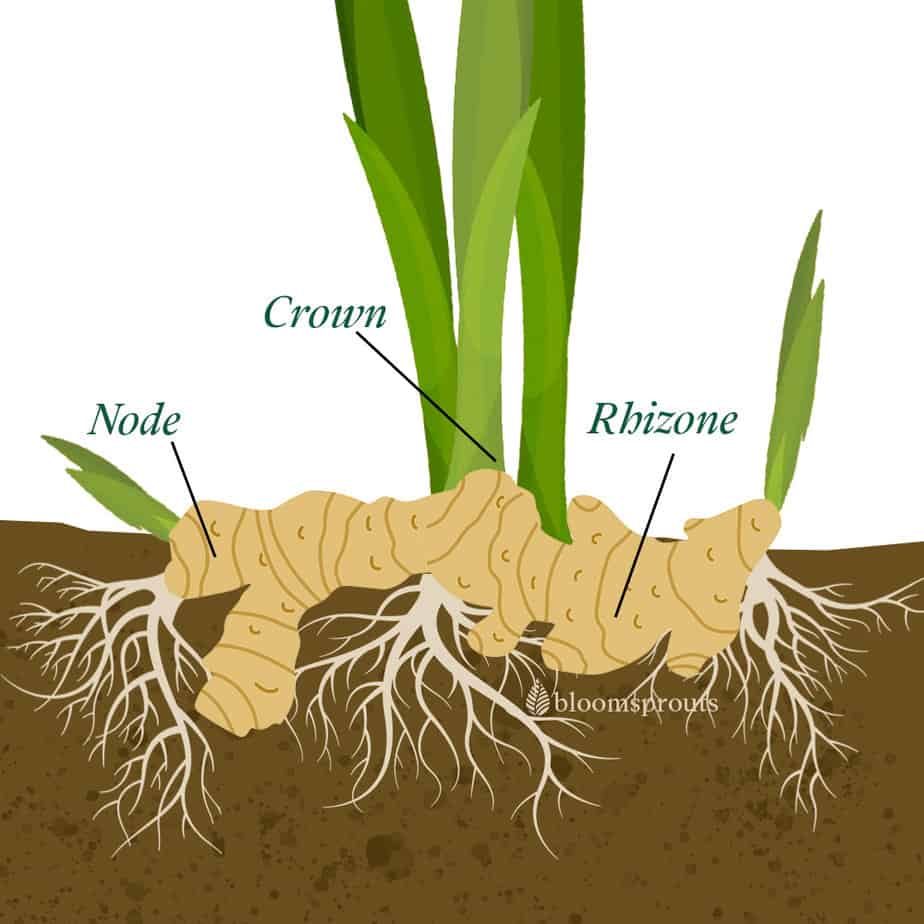
Rhizomes grow sideways instead of vertically, producing new leaves and roots along their length. To propagate your Spathiphyllum plant, you will need to dig up the entire peace lily and carefully separate the rhizomes.
Repot or Divide Your Peace Lily – Which is Better?
Your Spathiphyllum plant will eventually outgrow its pot at some point. When this happens, you can either replant it in a larger pot or divide it into multiple plants.
So, which is better?
Dividing your peace lilies is perfect if you want to get more plants, so you can gift some to your friends or family, or you can even sell them! It’s also a great way to fill empty spaces in your garden.
Furthermore, this method is faster and more convenient than growing new peace lilies from seeds, where you have to pollinate the plant, collect the seeds, and then wait for them to germinate.
When you propagate by division, you are also guaranteed to get a genetically identical plant as the parent plant. This means that the new plants will have the same appearance and mature size as the original plant.
On the other hand, if you’re short on space or you just want to keep things simple, then replanting your peace lily in a larger pot is probably the way to go.
Regardless of the case, if the plant is already too large for its pot, you will need to repot or divide it as soon as possible. Otherwise, it might suffer from rootbound, which can cause stunted growth and wilted leaves.
The Best Time to Divide Peace Lilies
While you can technically divide your peace lilies at any time of the year, it’s best to do it during the spring or early summer when the plant is actively growing and the temperature is warm.
This is because the plant will have an easier time recovering from the stress of division and will be more likely to produce new growth. Avoid extreme heat or cold as this can stress the plant.
Rather than timing it with the season, I prefer to divide my peace lilies when they show signs of overcrowding or rootbound, such as:
- You can see multiple crowns in the pot.
- Plants stopped blooming or produced fewer flowers
- After watering, the soil quickly dries out.
- Roots can be seen on the surface of the potting mix or emerging through the drainage holes.
Preparations Before Dividing Peace Lilies
Before you start dividing your peace lilies, there are a couple of preparations you need to do:
Decide Whether to Plant in Soil or Water
The first thing you need to do is decide whether you want to plant your divided peace lilies in soil or water.
Growing in water is less messy and tedious since you don’t have to worry about potting mix or drainage. All you need is a clean container and some fresh water.
You may also notice that your peace lily’s roots will grow faster in water since they will have direct access to nutrients and oxygen. Just keep in mind that you will need to transfer the plant to soil eventually as it’s not a long-term solution.
On the other hand, planting in the soil is a bit more work since you will need to prepare the potting mix and make sure it has good drainage.
The roots will also grow slower in the soil since they will have to search for food and water. However, this is the best method since it allows the roots to spread out and anchor the plant down.
Which method you choose is entirely up to you. Just keep in mind that you will need to adjust the care instructions accordingly.
For example, if you’re growing your peace lily in water, be sure to change the water every week and use a clean container. You will also need to fertilize more often since the nutrients will leach out faster.
Pick the Right Pot(s)
Choosing the right container is important if you are transplanting your peace lily into soil. The container should be clean, large enough to accommodate the roots, and have drainage holes.
I prefer to use plastic pots since they’re lightweight and cheaper than ceramic or clay pots. Plus, if you drop them, they won’t break. You can place the plastic pots inside decorative pots if you want.
Generally, peace lilies can be divided into pots of similar size, but if you’re repotting the plant, you’ll want to select a pot 2-3 inches larger in diameter.
Remember, do not use an oversized pot since this can lead to overwatering and root rot.
Prepare the Soil Mix
I recommend using an airy and well-draining potting mix since peace lilies don’t like to sit in wet soil. You can make your own potting mix by mixing together:
- Orchid bark (25%)
- Coconut coir (25%)
- Perlite (30%)
- Activated charcoal (10%)
- Worm casting (10%)
If you don’t want to make your potting mix, you can also purchase ready-made mixes from your local garden center. Just make sure it’s labeled as “well-draining” or “for tropical plants.”
Gather Your Tools
Last but not least, you may need to gather a few tools to help with the division process, such as: a clean knife or garden shears, gloves, and a trowel.
Now that you’ve gathered everything you need, it’s time to start dividing your peace lily.
Steps to Divide Peace Lily Plants
Here are the steps I take when dividing my peace lilies:
Step 1: Remove The Plant & Clean up the Roots
The first step is to remove the entire plant from its pot.
The easiest way to do this is to hold the plant by the stems and turn the pot upside down with the other hand. Tap the bottom of the pot gently until the plant slides out.
If the plant doesn’t come out easily, you can try tapping the pot on the ground a few times or running a knife around the edge of the pot.
Additionally, I found that limiting watering a few days before division makes removing the plant easier.
After removing the plant from its pot, gently brush the roots to get rid of any excess soil. To remove any dirt that clings to the roots, rinse them with water.
Trim off any dead or mushy roots with a clean knife or garden shears. You should remove these roots because they will not re-grow and may encourage root rot.
Step 2: Identify the Crowns
Once the roots are free of soil and debris, it’s time to check for growth crowns.
A growth crown is the point where leaves and roots emerge from the rhizome. Each peace lily typically has at least one growth crown, but as they mature, they can develop multiple crowns.
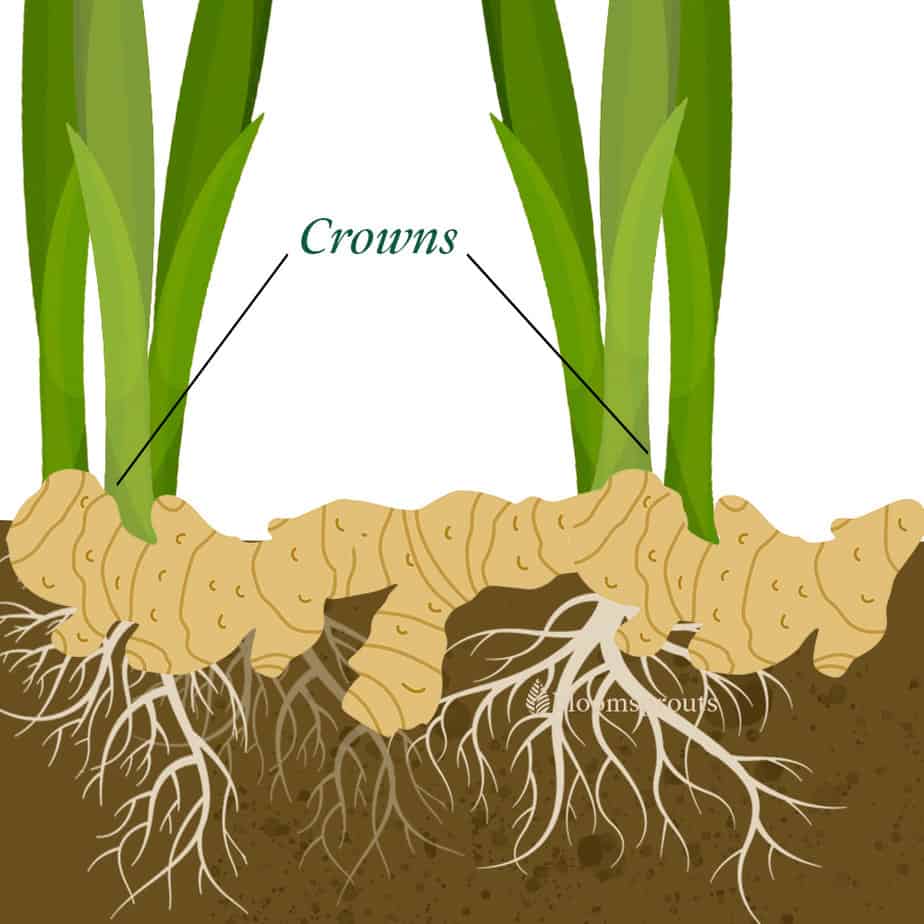
To identify the growth crowns, look for the tight cluster of stems growing from a single spot on the rhizome. When you have at least two crowns, you can start dividing the plant.
Tips:
If one of the crowns is too small, it’s better to keep it attached to a larger one so it can thrive after division.
Step 3: Divide Between the Crowns
Dividing younger peace lilies is much easier since the rhizome is softer and less woody. You can easily pull the plant apart by hand.
Older plants can be more challenging to divide. You may need to trim away some of the tangled roots first with sterile shears to free each section of the crown. After that, you can cut or pull the plant apart.

When dividing, make sure each of the crowns has a chunky part of the rhizome as well as several roots attached. This will minimize stress and encourage faster growth.
Step 4: Plant The Divisions & Water Well
Before placing the divisions in their new pots, you will need to pre-fill the pots with the potting mix up to a certain soil level. This ensures that your plant will sit at the right height in the pot and the roots have enough room to spread out.
You can hold your division inside the pot to measure how high up the potting mix should be.
After pre-filling the pots, gently place each division in its new pot. Add more potting mix around the roots until it’s level with the rest of the soil.
Once all divisions are potted up, water each plant well, making sure the water drains out of the bottom of the pot. It’s important not to overwater peace lilies since they’re susceptible to root rot.
Aftercare of Divided Peace Lilies
It’s important to keep an eye on your newly divided plants and make sure they’re adjusting well to their new homes.
Basically, you will want to provide the same care you would for a newly potted plant.
Keep the soil moist but not soggy. Stick your finger in the soil to check the moisture level before watering. If the mix still feels moist, I wait until it dries out a bit before watering again.
Additionally, place the pots in an area with bright, indirect light. If you live in a particularly hot climate, you may want to provide some afternoon shade to prevent the leaves from scorching.
Due to their native habitat, you’ll need to ensure there is a high level of humidity around your division (more than 50%).
If you have the budget, I recommend getting a humidifier for your plants. Alternatively, you can set the pots over a pebble-filled tray filled with water or cover the plants with a clear plastic bag.
Within a month, you should start to see new growth on your divisions. That’s how you’ll know they’ve successfully taken root and are on their way to becoming full-grown plants.
Peace lilies typically bloom once a year, usually in the spring or summer. However, if you provide the right care, you may be able to encourage blooming more than once a year.
Common Problem with Newly-Divided Peace Lilies
Wilting leaves are the most common problem with newly-divided peace lilies. This is usually due to the roots being damaged during the division process.
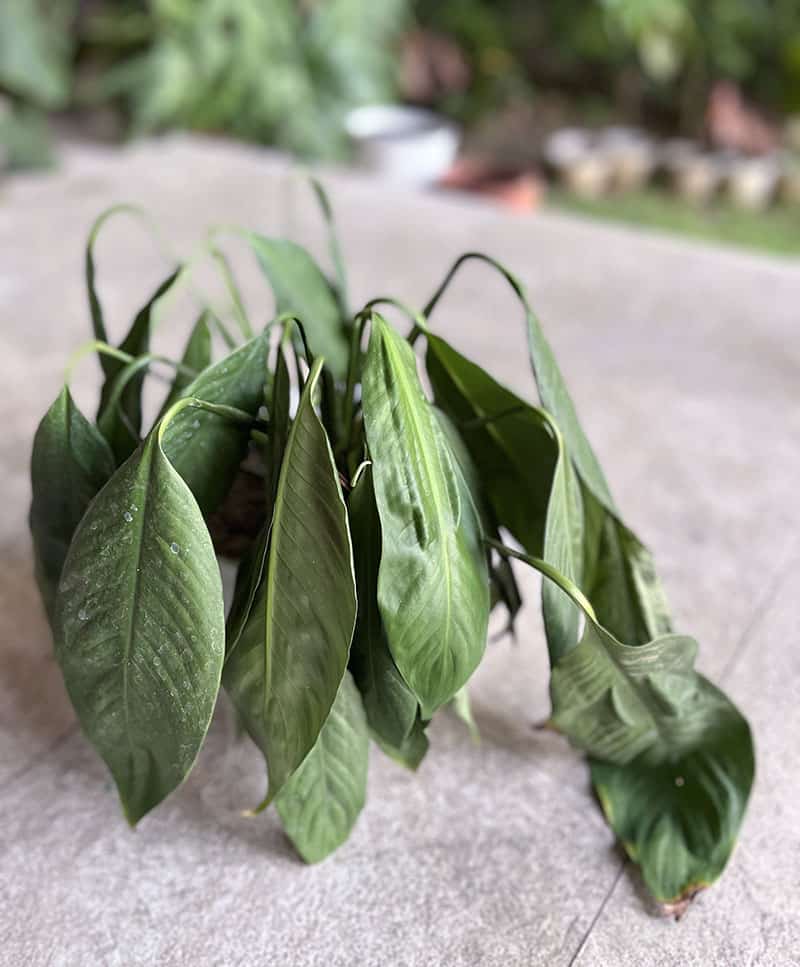
If the roots are damaged, they can’t take up water as efficiently, causing the cell wall to collapse and the leaves to wilt.
If this happens, don’t panic! Just make sure you’re not overwatering the plant and providing bright, indirect light.
The plant will likely recover within a few weeks as the roots start to grow back. If the problem persists, you can try re-examining the roots to see if root rot has set in.
If you see any mushy, black, or otherwise discolored roots, you will need to cut them away with sterile shears. After that, the plant should start to recover.
Frequently Asked Questions
How often does it take for peace lily to outgrow its pot?
Typically, a younger peace lily will outgrow its pot in 1 – 2 years. However, an older, more established plant may only need dividing or repotting every 3 – 5 years. This will depend on the size of the pot and how well you care for your plant.
Personally, I like to divide and repot my peace lilies every 2 years to keep them healthy, encourage new growth and of course, to have more plants!
Can you divide peace lilies while they’re blooming?
It is possible to divide peace lilies when they are in bloom, but the plant is likely to be stressed and the bloom will prematurely wilt. Ideally, you should wait until the bloom fades to avoid damaging the flowers.
Will Dividing A Peace Lily Kill Flowering?
If you divide a peace lily when it’s already in bloom, the flowers will likely wilt and die prematurely. However, the plant should recover and continue to bloom as normal once it has settled into its new pot.
Generally, peace lily will flower once a year, usually in the spring or fall, when the temperature and light levels are just right. However, if you provide optimal care, you may be able to encourage blooming more than once a year.
How can you grow your peace lily more quickly?
Providing the right care is the best way to encourage fast growth in peace lily. This includes bright, indirect light, high humidity, regular watering, and fertilizing once a month during the growing season.
If you want to take things a step further, you can try propagating your plant. This is the process where you divide the plant and grow new peace lilies from the divisions. Not only does this give you more plants, but it also helps to encourage fast growth.
Can You Propagate Peace Lilies From Seed?
It is possible to propagate peace lilies from seed, but it is a slow and difficult process. For this reason, it’s generally best to propagate peace lilies from divisions.
If you’re determined to try propagating from seed, you’ll need to be patient as it can take several weeks for the seeds to germinate. Once the seeds have germinated, you’ll need to provide very high humidity and bright, indirect light for the seedlings to emerge.
Covering the pot with plastic wrap or placing it in a terrarium can help to create the humid environment that peace lily seedlings need.
